接入 Inference LLM Perf
框架
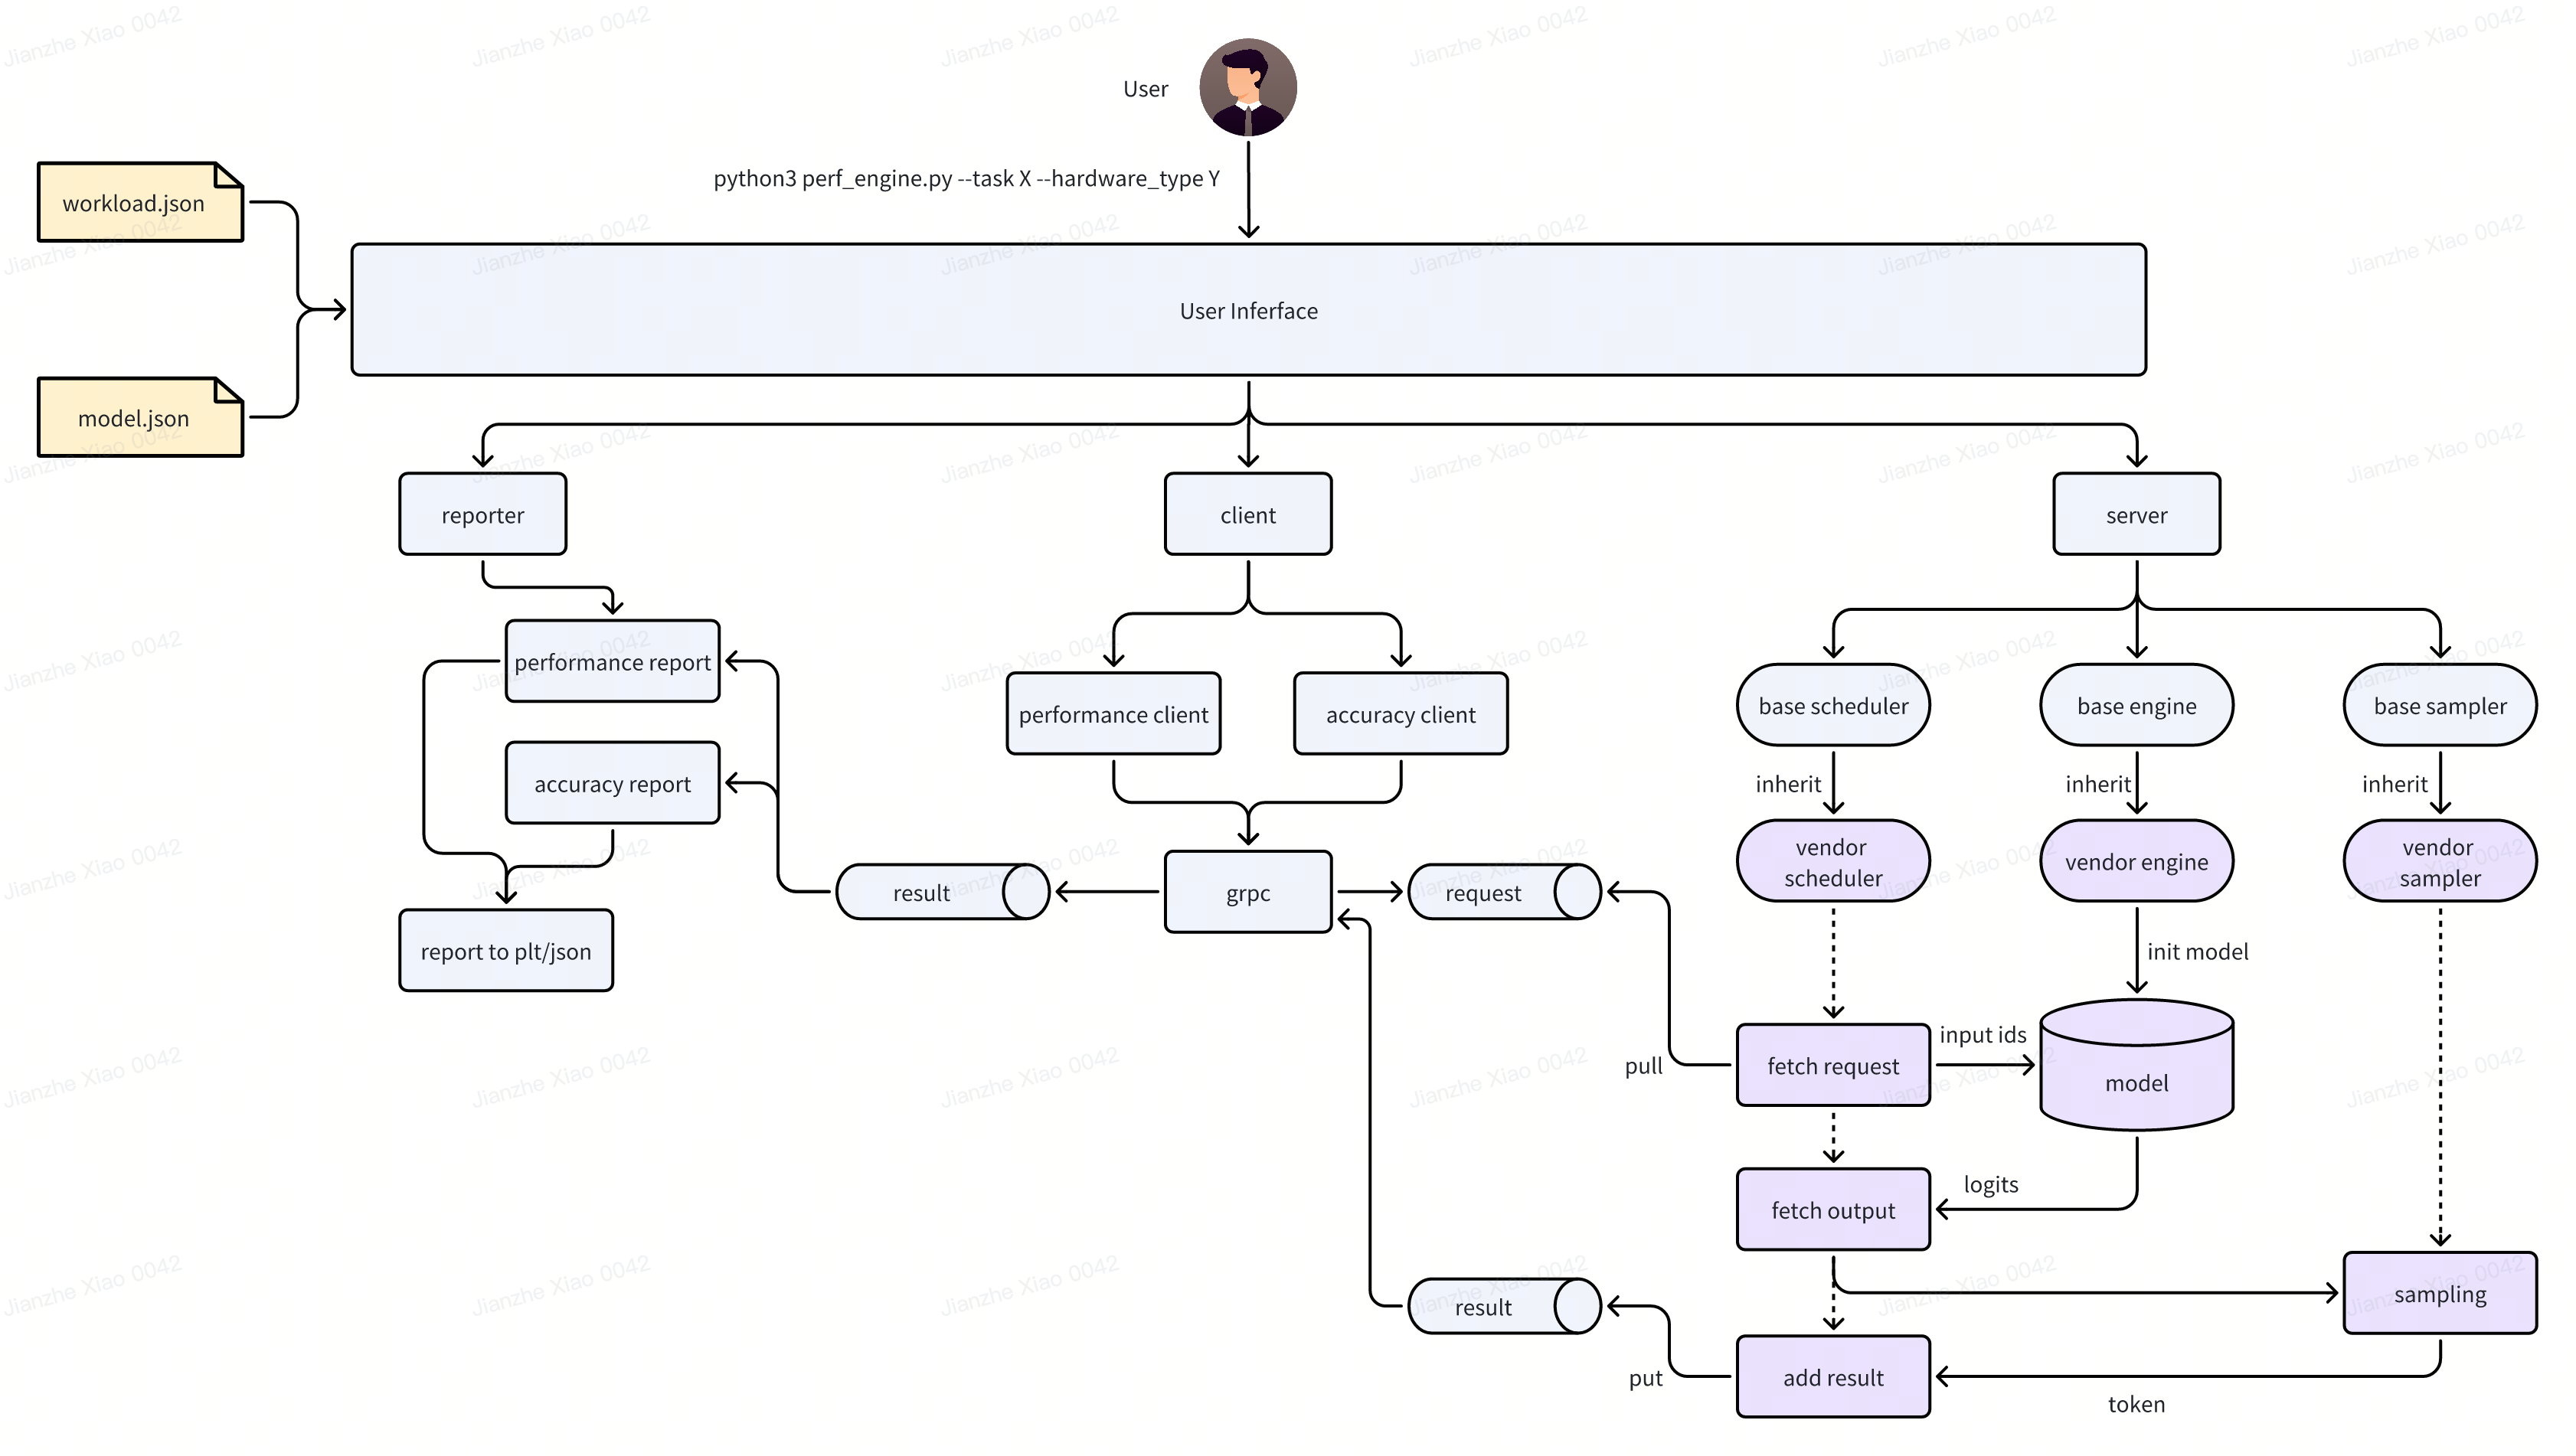
ByteMLPerf LLM Perf Vendor 架构如下图所示:

以下按模块说明
User Inferface
用户使用入口为perf_engine.py,在使用 Byte LLMPerf 时,只需传入--task 、--hardware_type 两个参数,如下所示:
python3 byte_infer_perf/llm_perf/core/perf_engine.py --task $<task> --hardware_type $<type>
--task
传入的 workload 名字,无默认值,必须用户指定。例如:若要评估 chatglm2-torch-fp16-6b.json 定义的 workload,则需指定--task chatglm2-torch-fp16-6b。
注:所有 workload 定义在 byte_infer_perf/llm_perf/workloads/ 下,传参时名字需要和文件名对齐。目前格式为 model-framework-precision
--hardware_type
传入的 hardware_type 名字,无默认值,必须用户指定。例如:若要评估 GPU ,则需指定--hardware_type GPU
注:所有 hardware type 定义在 byte_infer_perf/llm_perf/backends 下,传参时名字需要和 folder 名对齐。
--host & --port
server 启动的 host 与 port,有默认值,用户无需指定
Workloads
一个 workload 定义需包含如下字段:
chatglm2-torch-fp16-6b.json
{
  "model": "chatglm2-torch-fp16-6b", // 待评估模型的名字,需要和model_zoo名字对齐
  "test_accuracy": true, // 是否评估精度
  "test_perf": true, // 是否评估性能
  "min_new_tokens": 128, // 最少生成token数量
  "max_new_tokens": 256, // 最多生成token数量
  "tp_sizes": [1, 2], // 模型tensor并行度
  "batch_sizes": [1, 2, 4, 8], // 性能:client并发请求数量,server也可以根据这个值配置为组batch的最大请求数量
  "input_tokens": [1024, 2048], // 性能:client请求的输入长度(原始input数据长度,不包含<SEP>等特殊token)
  "dataset": "llm_perf/datasets/merged_52_test.csv", // 精度:评估精度diff时所用的数据集
  "perf_time": 180 // 性能:client压测时长,单位秒
}
需要注意的是,性能压测时,tp_sizes、batch_sizes 和 input_tokens 会进行组合请求,每次请求压测 perf_time 秒。示例 code:
for tp in tp_sizes:
    for bs in batch_sizes:
        for input_token in input_tokens:
            request(tp, bs, input_token)
最终每个组合都会产生一个延迟和吞吐性能数据。
精度压测时,会使用 tp_size 为 1,batch_size 为 1 进行测试。
ModelZoo&Dataset
ModeZoo 下收录 Byte LLMPerf 支持的大模型,目前支持 ChatGLM、ChatGLM2、Chinese-LLaMA-2。
Dataset 为模型精度测试时使用的数据集,目前为字节挑选的 52 条测试项。
Server
模型的 Server,会拉起模型服务,提供 GRPC server 接口,等待请求。
主要分为 3 个部分
- scheduler:
scheduler 负责调度请求,主要调用 engine 和 sampler 模块。从请求队列中取出请求,进行请求调度后,调用 engine 把请求递送给模型,获取模型输出后调用 sampler 进行采样,最终把采样 token 添加到结果队列。
- engine:
负责模型初始化与调用,被 scheduler 调用后,可以进行请求加工处理调用模型 forward,并获取结果。
- sampler:
负责采样,模型输出的 logits 由 scheduler 递送给 sampler 后,采样出下一个 token。
Client 与 Reporter
client 会根据 workload 中的定义,进行精度和性能测试。测试时,根据配置或数据集产生请求。
reporter 会根据 client 返回的请求结果记录并计算延迟和吞吐数据,最终产生精度与性能测试报告。
评估指标说明
LLMPerf 的评估会分为两个方面,如下:
运行精度评估
- 困惑度(perplexity)
- 与 A100 GPU 基准对比的 logits diff:52 条 prompt,每个 prompt 的 first token 的 logits 结果与 A100 结果进行对比,并绘制直方图,x 轴为 diff value,y 轴为 diff 频率。
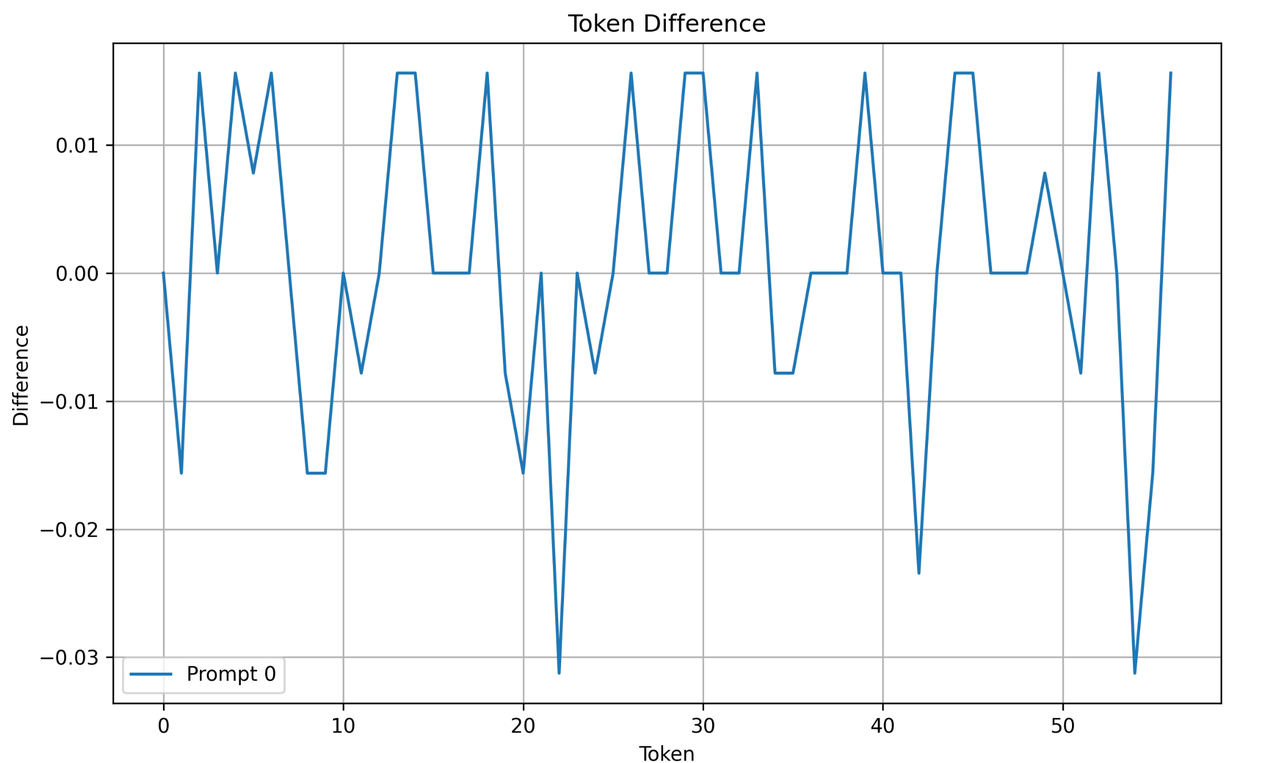
- 与 A100 GPU 基准对比的 token diff:n 条 prompt(目前为取 52 条中的 16 条),每个 token 对应的 logits 中最大值与 A100 结果进行对比,并绘制直方图,例如下图为 1 条 prompt 的 token diff。

运行性能评估
- first token 延迟:从发起请求到获取 first token 结果的延迟
- per token 延迟:含 first token 在内的每个 token 平均延迟
- token throughput:每秒模型输出的 token 数量
- QPS:每秒可以处理的请求数量
报告样例
报告样例如下:
report.json
{
  "Model": "chatglm2-torch-fp16-6b",
  "Backend": "GPU",
  "Host Info": "Intel(R) Xeon(R) Platinum 8336C CPU @ 2.30GHz",
  "Min New Tokens": 128,
  "Max New Tokens": 256,
  "Accuracy": {
    "PPL": [3.71, 1.23, 4.56, 7.89],
    "Token Diff": {
      "Prompt Num": 16,
      "Max Difference": 0.0546875,
      "Png": "/reports/GPU/chatglm2-torch-fp16-6b/token_diff.png"
    },
    "Logits Diff": {
      "Max Difference": 0.0546875,
      "Mean Squared(MSE)": 0.000321191,
      "Mean Absolute(MAE)": 0.0043765840062,
      "Cosine Similarity": 0.99999707748038,
      "Png": "/reports/GPU/chatglm2-torch-fp16-6b/logits_diff.png"
    }
  },
  "Performance": [
    {
      "TP Size": 1,
      "Batch Size": 1,
      "Input Tokens": 1024,
      "First Token Latency(AVG)": 0.09622498920985631,
      "Per Token Latency(AVG)": 0.10014404410319304,
      "First Token Latency(P90)": 0.0975721836090088,
      "Per Token Latency(P90)": 0.10135569516786805,
      "Token Throughput": 9.98536978040405,
      "Request Number": 7,
      "QPS": 0.03885357891207801
    }
  ]
}
接入指南
LLMPerf 架构设计中,框架和 Backend 隔离,厂商可以自己实现 Backend 接入,作为 ByteMLPerf 后端参与评估测试
创建 Backend
- 在
byte_infer_perf/llm_perf/backends/目录下新建以 backend name 命名的文件夹,所需用到的所有依赖都需存放在该目录下,比如 GPU backend,目录名为 GPU。
- 添加
$<backend>_scheduler.py 、$<backend>_sampler.py 、$<backend>_engine.py,用来实现 server 中的功能。
- 添加
setup.py,负责向上提供 scheduler 接口。
- 添加
model_impl/目录,如果要修改默认模型实现,可以把自定义模型实现在model_impl/目录中。
实现 Setup
在 setup.py 中,需要实现的 API 为
def setup_scheduler(
    modelcls, model_config: Dict[str, Any], max_batch_size: int, **kwargs
) -> CoreScheduler:
参数解释
- modelcls:模型的接口类,可以通过 modelcls 来调用模型接口类进行模型初始化,例如 ChatGLM 可以调用 modelcls.from_pretrained()加载模型
- model_config:模型配置参数,内容是定义在 ModelZoo 下与模型同名的 json 文件中,例如 ChatGLM 的的配置为
chatglm.json
{
  "model_name": "chatglm",
  "model_path": "llm_perf/model_zoo/sota/chatglm-torch-fp16-6b",
  "model_interface": "ChatGLMForConditionalGeneration",
  "network": {
    "_name_or_path": "THUDM/chatglm-6b",
    "architectures": ["ChatGLMModel"],
    "auto_map": {
      "AutoConfig": "configuration_chatglm.ChatGLMConfig",
      "AutoModel": "modeling_chatglm.ChatGLMForConditionalGeneration",
      "AutoModelForSeq2SeqLM": "modeling_chatglm.ChatGLMForConditionalGeneration"
    },
    "bos_token_id": 130004,
    "eos_token_id": 130005,
    "mask_token_id": 130000,
    "gmask_token_id": 130001,
    "pad_token_id": 3,
    "hidden_size": 4096,
    "inner_hidden_size": 16384,
    "layernorm_epsilon": 1e-5,
    "max_sequence_length": 2048,
    "model_type": "chatglm",
    "num_attention_heads": 32,
    "num_layers": 28,
    "position_encoding_2d": true,
    "torch_dtype": "float16",
    "transformers_version": "4.23.1",
    "use_cache": true,
    "vocab_size": 130528
  },
  "tokenizer": {
    "path": "llm_perf/model_zoo/sota/chatglm-torch-fp16-6b",
    "add_sep_token": false
  }
}
- max_batch_size:本轮测试时会产生的最大请求 batch size 值,可以根据 max_batch_size 来实现自定义 batching 等功能。
返回值:函数需要返回 Backend 实现的 scheduler 实例,后续请求会发送给这个 scheduler 实例。
实现自定义模型(可选)
如果对模型实现进行了修改(确保精度不会产生较大误差),例如使用了自定义的算子等,需要
- 把修改后的模型代码放在
model_impl/目录下,例如自定义 ChatGLM 模型代码文件为model_impl/private_chatglm.py
- 把自定义模型信息登记在
model_impl/__init__.py中,其中 all 是一个 dict,key 为 ModelZoo 下模型配置中的 model_name 值,value 为自定义模型的接口类名,例如
__all__ = {
    "chatglm" : ChatGLMForConditionalGeneration,
    "chatglm2" : ChatGLM2ForConditionalGeneration
}
chatglm 来自 model_zoo/chatglm-torch-fp16-6b.json 中的 model_name,ChatGLMForConditionalGeneration是 model_impl/private_chatglm.py 中实现的接口类名
实现 Scheduler
需要实现的接口是
def scheduler_loop(self):
    raise NotImplementedError
scheduler_loop 函数需要等待 packet_queue 队列中的请求,取出后与 engine 和 sampler 进行推理与采样后把结果添加到 result_queue 中。
注:scheduler_loop 函数永远不应该返回,没有请求时应该堵塞等待请求,如果 scheduler_loop 函数返回则说明出现 BUG。
实现 Engine
需要实现的接口为
def init_inference(self, model: torch.nn.Module):
    """Initialize inference engine, load model and do compile if needed."""
    raise NotImplementedError

def do_inference(self, packets: List[Packet]):
    """Real inference function, do inference and return logits

    Args:
        packets: batch packets of inference

    Return:
        inference results of batch packets
    """
    raise NotImplementedError
- init_inference 函数中按需进行模型的加载、初始化等功能。
- do_inference 函数中实现推理调用,参数是一组请求,返回模型推理结果,do_inference 被 scheduler 组 batch 后进行调用。
实现 Sampler
需要实现的接口为
def sample(self, packets: List[Packet], logits: torch.FloatTensor) -> List[int]:
    """Sample next tokens

    Args:
        packets: sample batch packets
        logits: model inference outputs, shape is (sum(len(input_ids) of each packet), vocab_size)

    Return:
        next_tokens: next token list of each request
    """
    raise NotImplementedError

def postprocess(
    self,
    packets: List[Packet],
    infer_outputs: Dict[str, torch.FloatTensor],
    next_tokens: List[int],
) -> List[GenerateResult]:
    """Postprocess sample result tokens

    Args:
        packets: sample batch packets
        infer_output: inference outputs, contain 'input_logits' and 'last_logits' `{"input_logits": tensor, "last_logits": tensor}`
            input_logits: model inference output input logits
            last_logits: model inference outputs last logits, shape is (sum(len(input_ids) of each packet), vocab_size)
        next_tokens: sample packets next token list

    Return:
        GenerateResult list of packets
    """
    raise NotImplementedError
- sample 函数负责采样下一个 token,参数是需要被采用的一组请求和对这组请求模型推理输出的 logits,返回一个 List,是每个请求采样的 token 结果。top_k、top_p 等参数可以通过每个请求的 generate_config 来获取。
- postprocess 函数负责处理采样的结果,参数是被采用的一组请求、推理结果以及采样 token 结果,返回值是每个请求对应的 GenerateResult。
厂商接入测试
要求
- Python >= 3.8
- torch >= 2.1.0
安装
# 厂商可以安装自己适配的torch版本
pip3 install torch==2.3.1 --index-url https://download.pytorch.org/whl/cu121

# 安装其他依赖库
pip3 install -r requirements.txt
快速测试(测试模型精度和性能)
确认已经完成下述安装步骤以进行测试:
- 修改模型任务配置,比如 mixtral-torch-bf16-8x22b.json
- 使用 prepare_model.py 或者 huggingface-cli 下载模型权重
- (如有)使用 prepare_model.py 下载参考输出。
- 开始精度和性能测试。
运行下述命令开始自动精度和性能测试:
python3 byte_infer_perf/llm_perf/launch.py --hardware_type GPU --task mixtral-torch-bf16-8x22b
精度测试(使用指定输入单测)
下述命令启动运行 mixtral-8x22b 模型的服务,其中配置为tp_size=8, max_batch_size=8:
cd byte_infer_perf/llm_perf
python3 ./server/launch_server.py --hardware_type GPU --model_config ./model_zoo/mixtral-torch-bf16-8x22b.json --tp_size 8 --max_batch_size 8
使用单个输入测试服务,并获取推理结果,logits numpy 文件和模型 forward 时间。输出文件会保存在 ./reports/single_query/ 目录下。
python3 ./script/single_query.py --prompt "What is 7 multiplied by 7?" --batch_size 8
性能测试
单独测试运行 mixtral-8x22b 的 MpEngine 推理性能。运行下述命令可以获取性能输出。可以在 ./bench_model.py 中修改测试用例。
python3 ./bench_model.py --hardware_type GPU --model_config ./model_zoo/mixtral-torch-bf16-8x22b.json --tp_size 8 --max_batch_size 8
输出会放在 ./reports/{hardware_type}/{model_config}/bench_model:
- config.json: 测试配置。
- context_perf.csv: prefill阶段, 包含指定batch_size, seq_len对应的推理延迟。
- decode_perf.csv: decode阶段, 包含指定batch_size, seq_len对应的推理延迟。
- output.txt: 纯模型性能数据。


